Adding Icon to BizTalk Custom Pipeline Components
In BizTalk customization of Receive or Send Pipeline is very
popular; However BizTalk developer ignores putting any Icon to their pipeline
components. Giving pictorial notification/annotation adds value and in long run
it really pays back. Moreover adding icon to your pipeline components gives
professional touch to your component and showcases your sophisticated skills.
Add Icon to your Receive or Send Pipeline in not so
convoluted..
Using Resource file technique it make rather simpler, follow
the blow steps in your exiting custom pipeline component project and see the
changes..
I assume your custom pipeline component project has name
like DK.POC.BT.PipelineComponents.
Project structure some like below image:

Figure 1
Step 1:
Right Click on Pipeline component project (e.g. DK.POC.BT.PipelineComponents) and new
items, search for resource item in add New Item window.

Figure 2
Add the resource as Resource.resx.
Step 2:
Double Click on newly added Resource.resx file and add Description, Name and Version as String

Figure 3
Step 3:
Select Images Menu (Ctrl+2) from left most Strings Menu
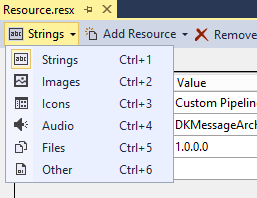
Figure 4
Add few images which could be Iconic representation of your
custom pipeline (I have added 3) by selecting Menu itmes Add Resource >>
Add Existing File.. ( you may convert your icon to create some images online https://iconverticons.com/online/)
Select each image from the resource and change its property
from Linked at compile time to Linked at compile time (this is very
critical to set). Now your project explore supposed to look like figure 5.

Figure 5
And just Delete the newly added in your project folder Resources.
Step 4:
Open your component class file, in my case the name is DKMessageArchiver.cs.
(also you may close Resource.resx window)
Go to your Class Variable declaration and add new Private object
of type ResourceManager (you can find this type in namespace System.Resources.ResourceManager) .
Your Object declaration will be similar to below line
private System.Resources.ResourceManager rsManager = new System.Resources.ResourceManager("DK.POC.BT.PipelineComponents.Resource", Assembly.GetExecutingAssembly());
Make sure the base name DK.POC.BT.PipelineComponents.Resource matches
with project namespace and Resource file name.
DK.POC.BT.PipelineComponents
=> project namespace
Resource =>
and Resource file name
Step 5:
Implement and new method using IComponentUI interface. (Just
write click on IComponentUI and select “Implement Interface Explicitly” (as show
in figure 6).

Figure 6
I will create 2 new methods.
IntPtr IComponentUI.Icon
{
get { throw new NotImplementedException(); }
}
IEnumerator IComponentUI.Validate(object projectSystem)
{
throw new NotImplementedException();
}
Change the methods as shown below:
IntPtr IComponentUI.Icon
{
get { return ((System.Drawing.Bitmap)(this.rsManager.GetObject("Backup_Archive16", System.Globalization.CultureInfo.InvariantCulture))).GetHicon(); }
}
IEnumerator IComponentUI.Validate(object projectSystem)
{
return null;
}
Note:
String Name parameters should match exactly the you have
given to your images during uploading to resource file. Here the name is "Backup_Archive16" same name
matching with 2nd picture in figure 5.
Step 6:
Additional steps to read Name, version and description from
Resource file for your pipeline component.
Same as previous steps generate 3 methods from IBaseComponent
, something like below months.
string IBaseComponent.Description
{
get { throw new NotImplementedException(); }
}
string IBaseComponent.Name
{
get { throw new NotImplementedException(); }
}
string IBaseComponent.Version
{
get { throw new NotImplementedException(); }
}
Change the methods
such Name, version and populates from Resource file:
string IBaseComponent.Description
{
get{ return rsManager.GetString("Name", System.Globalization.CultureInfo.InvariantCulture);}
}
string IBaseComponent.Name
{
get{ return rsManager.GetString("Description", System.Globalization.CultureInfo.InvariantCulture);}
}
string IBaseComponent.Version
{
get { return rsManager.GetString("Version", System.Globalization.CultureInfo.InvariantCulture); }
}
Note: read Name, Version and Description are declared in
Resource file as String Resources.
Step 7:
You pipeline component is not ready with ICON, just one more
step below building it..
Go to project Property >> Build Events and in Post-build
event command line add below script (it put your assembly in GAC after build,
not extra effort required to GAC your assembly)
For Visual Studio 2013:
CALL
"%VS120COMNTOOLS%vsvars32.bat"
gacutil.exe /i "$(TargetPath)"
gacutil.exe /i "$(TargetPath)"
For Visual Studio 2010:
CALL
"%VS100COMNTOOLS%vsvars32.bat"
gacutil.exe /i "$(TargetPath)"
gacutil.exe /i "$(TargetPath)"

Figure 7
Finally build your pipeline component. After successful
build you can see your pipeline component in GAC.
Run >> %windir%\Microsoft.NET\assembly
>> GAC_MSIL

Figure 8
Step 8:
Open your BizTalk Pipeline Project add a new Pipeline (e.g. RcvArchivalPipeline.btp),
double click on btp file and right click on Toolbox and select “Choose Items..”

Figure 9
Go to BizTalk Pipeline Components TAB and select your
pipeline component dll file from GAC (e.g. C:\Windows\Microsoft.NET\assembly\GAC_MSIL\DK.POC.BT.PipelineComponents).

Figure 10
After opening the dll you need to check the checkbox against
the Pipeline component Name.

Figure 11
Once your select and
press ok from the dialog box your pipeline component will appeared in Toolbox
panel, with the same Icon you have assigned. As shown in figure 12.

Figure 12
Step 9:
Drag and drop the pipeline component to your pipeline on to
a desire stage and it will come with proper icon you have assigned. Also see in
property window all assigned property has been populated like Name, Description
and Version.

Figure 13
Scenario:
Icon you have assigned
is not suitable and you want to change this to a more meaningful icon or which
suits to your test.
If you are unhappy with your Pipeline component icon you can
changes this very easy..
Add a new Images as explained in step 3.
Change the code with new image name.
Change the code with new image name.
IntPtr IComponentUI.Icon
{
get { return ((System.Drawing.Bitmap)(this.rsManager.GetObject("NewImageName", System.Globalization.CultureInfo.InvariantCulture))).GetHicon(); }
}
Before Rebuilding you code
-
Delete pipeline component from pipeline stage.
-
Remove reference of pipeline component from
pipeline project.
-
Right Click and delete pipeline component from
ToolBox.
Rebuild you project, make sure in GAC you have new date time
for Pipeline component.
If this pipeline component already used by BizTalk restart
related Host Instances.
Restart your Visual Studio IDE. Then add the Pipeline
component from GAC as explained in step 8.
Errors.
Most commonly you will see Error “you
have selected an invalid pipeline component assembly. please check security
settings for the assembly if you are loading it from an UNC path” when
working with Pipeline components Interfaces like IBaseComponent or IComponentUI.

Figure 14
This happened basically because your code don’t find the
required resources from your *.resx file.
You need to cross check each item which has a reference to
your resources file.
In my case Resouce file name is declared in code DKResource
where as physical file name only Resource. Which cause the issue. Or
if I change the name space of the project.
private System.Resources.ResourceManager rsManager = new System.Resources.ResourceManager("DK.POC.BT.PipelineComponents.DKResource", Assembly.GetExecutingAssembly());
I hope it’s clear and not complex to implement. Let me know
your Questions/Feedbacks..
Enjoy professional coding.
No comments:
Post a Comment